

ChessBase 17 - Mega package - Edition 2024
It is the program of choice for anyone who loves the game and wants to know more about it. Start your personal success story with ChessBase and enjoy the game even more.

Yasser Seirawan’s new book Chess Duels My Games with the World Champions has just been published by Everyman Chess, London. It’s a 427-page hardback and is already receiving critical accolades. The British Chess Magazine has commented:
‘Seirawan writes discursively and entertainingly about his subjects, embracing the games he played with them, social interactions, arguments and chess politics (especially in his long section on Garry Kasparov). It’s gossipy, anecdotal, emotional, humorous, insightful and absolutely riveting.’
On this webpage we see that Seirawan will be signing copies of the book at Chess & Bridge, 44 Baker Street, London from 5 p.m. to 6.30 p.m. on Thursday, 10 June 2010. The session will be followed by a lecture plus questions and answers, but anyone unable to be in London that day can still order from the Chess & Bridge website a personally dedicated copy of the book, for dispatch by post. You can also browse a small part of the book here on Amazon.
In the meantime, we are grateful to Yasser Seirawan for sharing with ChessBase readers some insights into how Chess Duels came about. So, over to Yasser …
Inspiration for Chess Duels came from the writings of Mikhail Tal, the eighth World Chess Champion. I’ve always admired Mischa’s games, even if I could never imitate them. Two of my top-ten favorite chess books are by Tal: Tal-Botvinnik 1960 and Life and Games. I wanted Duels to read like the latter work, a mixture of entertaining stories, reliable annotations and personal accounts which would enthrall readers and leave them thirsting for more.
Well, readers will decide for themselves whether Duels can aspire to such a lofty comparison or whether I’ve crashed and burned. In any case, Duels aims to provide a mixture of stories and annotations where – just like a complex, messy game of chess – we experience gusts of rapture and agonies of despair. The chess world is a passionate, topsy-turvy one, and I’ve tried to capture the ups and downs as truthfully and accurately as possible. Through an honest personal account of my games and meetings with the World Champions I’ve invited the reader to a front-row seat, to show what it has been like to encounter and compete against the giants of the chessboard.
It is awkward for me – in fact, downright impossible – to provide a brief snapshot of Duels. I can’t say, “I like this bit best,” when in truth I like the whole of the book. There is much that didn’t make it between the covers because the work had already ballooned beyond 400 pages by the time I had missed a second Everyman deadline …
My choice of an extract for ChessBase readers is prompted by the fact that Anatoly Karpov is making newspaper headlines once again. It would seem appropriate to pull out something about him from Duels. I feel it would be unfair to show a win of mine, and as a way of properly reflecting our score against each other I’ve selected a loss. A particularly painful one at that. We’ll start our excerpt with a story which has a cliffhanger ending. Then comes the game itself (shudder), followed by the resolution of the story. It may appear a strange mix, but in that case I’ve done well, because it reflects the nature of Duels and what I hoped to accomplish.

GM Yasser Seirawan
From pages 186-187: Chapter 7 (Anatoly Karpov)
I was in Spain, perhaps on holiday, became bored and decided on the spur of the moment to drop in on the 1981 Linares event. Larry Christiansen and Lubomir Kavalek were participants, so I had reason to hang around for a few days. While there, I helped Larry a little with his game preparations, along with a friendly “Go get ’em tiger!” comment before the round. Whatever we did didn’t hurt. Larry tied for first place with Anatoly.
The incident I have in mind (and I do think it happened in Linares during this particular visit) is that we had a bridge game going for very small stakes in Spanish pesetas. Hardly enough to buy a round of drinks. Larry was my partner and we were playing Kavalek and Karpov. I was the weakest player at the table by far, and Larry would have to carry the team. Not successfully enough, unfortunately, as Larry and I were being killed. (That is, we probably owed two whole rounds of drinks.) At a certain moment Lubosh went to the bar for a round of drinks while Anatoly visited the restroom, leaving Larry and me alone. “Let’s fix the deck,” Larry whispered to me.
“What?”
“Let’s fix the next hand. When they bid the contract, you double, okay?” Well, let’s say the devil got the upper hand on this one, and I agreed. In no time at all Larry had fixed the deck. Let’s be clear, this wasn’t Ian Fleming’s Moonraker moment where James Bond switches a pre-made deck of cards. Larry did it almost instantly. Was he practiced? By the time Anatoly started walking back to the table, he could see that I made a show of “cutting” the cards to give the ruse that all was on the straight up. Lubosh returned with drinks and was pleased to discover a very fine hand awaiting his arrival. Between them I think they had 34 points and got to “game” lickety-split. I, of course, doubled – for absolutely no reason. The bidding had all been one-sided. This was met by a “redouble” which caused much laughter as our opponents started complaining about being insulted...
In the end, Anatoly played the contract and Lubosh was proud as punch to show his dummy honors. Anatoly started with the words, “Aiy-yi-yi.” He immediately understood that their hands duplicated honors and that he would be very fortunate indeed to make the contract. Well, as luck would have it every finesse went against him. Anatoly, bless his heart, cursed with each lost trick. I definitely had the impression that Russian is a rich language in which one can curse really very well. It was quite a treat. To this day, I don’t know how Larry and I held our nerve and didn’t burst into convulsive laughter. Lubosh made it around the table to see Anatoly’s dilemma, said something like “Oh, Jesus. Let me get another round...” and departed.
Well, Anatoly went down badly, something like four tricks, vulnerable, doubled and redoubled. When Lubosh returned, Anatoly went into a long-winded explanation of how terrible the hand was. Larry and I were stuck – the complaining was so vociferous we couldn’t bring ourselves to confess. Instead, we quietly continued playing like good Christians. I suspect that single hand may have brought us to even on the scorecard... This story has a continuation, but let us call it a cliffhanger for the moment.
From pages 313-326: Chapter 9 (Anatoly Karpov Post-1985)
Every player has had dramatic, painful losses. Most certainly this book contains many of mine, and the following game resonates deeply. It takes the whole enchilada, taco and piñata as well. To understand why, just think of the following: it was a big game and I had built myself up for it, preparing at some length; Anatoly fell right into my preparation. Then I was comprehensively outplayed and lost. Anatoly slipped twice, allowing me back into the game. I struggled like mad and when on the brink of a draw blundered decisively just before the secondary time-control. Then, following a two-day adjournment, I studied the position as deeply as I was able, only to discover that my analysis was all a very large pile of manure. It was an exhausting effort for which a big fat zero appeared on the crosstable with no acknowledgment for all my suffering. In the poetic words of a Caliph sponsor of Al-Suli which I adapt to the situation, “My rose-water turned to urine.”
To follow this game you can set up a chessboard next to
your computer screen – or,
more practically, you can use this
JavaScript board, which can be opened in a
separate window and placed beside the text below. Note that you can click on
any move or variation in the JavaScript notation and the board will follow.
1.e4 e5 2.Nf3 Nf6 3.Nxe5
In the other main line of the Petroff, 3.d4 Nxe4 4.Bd3 d5 5.Nxe5 Nd7 6.Nxd7!?, I’ve always liked the quote of Bent Larsen to describe White’s sixth move “I don’t play such moves.” Indeed, it seems quite strange to hop three times with a knight in the opening, in order to trade it for a piece that has just developed. Such are the vagaries of opening theory.
3...d6 4.Nf3 Nxe4 5.d4 d5
Timman makes a mind-twisting observation at this juncture: “Remarkably enough, this position could also have arisen with reversed colors from the Exchange Variation of the French, viz. after 1.e4 e6 2.d4 d5 3.exd5 exd5 4.Nf3 Nf6, and now 5.Ne5, and although this knight jump doesn’t look all that bad, White would have a real battle on his hands just to equalize.”
6.Bd3 Be7 7.0-0 Nc6 8.c4 Nb4 9.Be2 Be6 10.Nc3 0-0 11.Be3
At the time, all these moves could best be described as main-line theory. Black now has reasonable continuations such as 11...Bf5 and 11...Bf6, but I was drawn to a far different approach.
11...f5!?
This was my novelty. It is not the kind of weakening move that one should make lightly. The e5-square is now a permanent hole, but I was attracted to a long-term idea of creating a kingside initiative.
12.a3!
An important little move to clarify the situation in the center. Now that the e4-knight is well protected, the c4-pawn was threatened with capture. The trade 12.cxd5?! Nxd5 13.Nxe4 fxe4 14.Ne5 Nxe3 15.fxe3 Rxf1+ 16.Qxf1 Bg5 is helpful for Black as he is able to resolve the question of what his b4-knight is doing.
A highly intriguing position occurs after 12.c5!? f4 13.Bc1 Nc6 14.Qb3 Ng5 15.Rd1 Qd7 16.Qxb7!? Nxf3+ 17.Bxf3 Rab8 18.Qa6 Bf6 19.Ne2 g5 20.h3 Rb4! 21.a3 Rxd4!. I wanted to play this crazy sacrificial line against someone but never found a victim. Again, it was these types of kingside initiatives that made 11...f5 an attractive option. Positionally, the line is a little dodgy for Black but I was intrigued by the line’s potential – as this note shows it is very easy for White to play natural moves and fall into an awkward position.
12...Nxc3
I have to avoid 12...Nc6? 13.Nxd5 Bxd5 14.cxd5 Qxd5 15.Rc1, when I don’t like Black’s position one bit.
13.bxc3 Nc6 14.Qa4!?
An important tactical justification for Black’s play occurs after the direct 14.cxd5 Bxd5 15.c4 Bxf3 16.Bxf3 f4! 17.Bd5+ Kh8 18.Bc1 Nxd4 19.Rb1 Bc5! 20.Bb2?! Qf6, a line that I kept triple-checking in my preparations to be sure I hadn’t missed something dire.
The text, on the other hand, keeps the central tension alive and forces Black to resolve the situation. I was still comfortably in my preparation and thought I had found an equalizing solution.
14...f4 15.Bd2
The move I expected. Afterwards a good argument was made for 15.Bc1, the idea being to keep the d2-square free for Nf3-d2-e4 and to make the alignment Bc1-b2 and c3-c4 possible, when the dark-squared bishop is well posted on the long diagonal. Personally, I’ve always enjoyed driving my opponent’s pieces backwards. How far back they go is his choice.
15...Kh8 16.Rab1 Rb8 17.Rfe1 dxc4
Perhaps it is premature to resolve the tension, as 17...a6!? is an interesting option. If White continues 18.Bd3!? dxc4 19.Bxc4 Bg4, we have transposed into the game where the move ...a7-a6, would have been very useful. I was concerned about 17...a6 18.c5!? when my bishop has been denied use of the d6-square.
18.Bxc4 Bg4 19.Be2 Bd6
A natural move which will give me cause for regret. In a later game, M.Rohde-Y.Seirawan, played at the 1986 US Championship in Estes Park, I first inserted 19...a6!?, as an attempted improvement. That game continued 19... a6 20.h3 Bh5 21.Ng5 (to take advantage of my ...Be7-d6 omission) 21...Bxe2! (not 21...Bxg5? 22.Bxh5 f3 23.Bxg5 Qxg5 24.Bxf3! Rxf3 25.Qxc6!, which is a cute trick that takes advantage of my back-rank) 22.Ne6 Qd5 23.Rxe2 f3! 24.Ree1? (24.Ree3 is forced) 24...fxg2 25.Nxf8 Rxf8 26.Qd1 Qf5 27.Kxg2 Qxf2+ 28.Kh1 Rf3, and I went on to win.
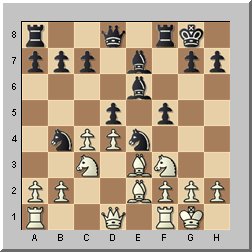
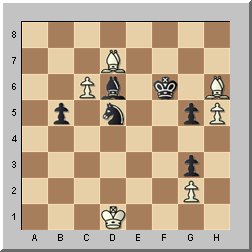
20.h3 Bh5 (Diagram 138)
One can only prepare so much and for so far. Here is where my preparation stopped, as I was satisfied with the position. How to sum up the opening struggle? White has nice central pawns, good piece development and a safe king. That’s the good news. The bad news is that the d2-bishop isn’t a very happy camper. In my mind’s eye I thought my development reasonable, and my king was even a tad safer. I anticipated being able to complete my development by ...Qd8-f6, and I could face the future with confidence. I have the potential for a kingside pawn-storm and who knows what dangers may lurk there? Let me just make one further point: when facing a “giant” it is vital that you go prepared with an idea for the game, as if you are so lucky as to catch one in your preparation it gives you a very pleasant feeling indeed.
21.Rb5!
Neither before the game nor at the board did this move occur to me. A kind of blind-spot if you will. While such a maneuver is common in many lines of the Petroff it just failed to register as a possibility. It really is a very good move because it disrupts my hoped-for kingside initiative and simultaneously makes the hop Nf3-g5 playable. It is what could be described as an irksome move that spoils my hopes of creating an initiative.
21....Be8?
An over-reaction to the threat of capturing the h5-bishop. I saw ghosts after 21...Bg6 22.Ng5!? Re8 23.Qc4 Qf6 24.Bd3, when I feared White would be in time to reposition his f3-knight nicely to either the e6- or e4-squares. This simply isn’t the case, as after 24...Rxe1+ 25.Bxe1 a6! 26.Bxg6 axb5 27.Nf7+ Kg8 White should take the perpetual check by 28.Nh6+, as his queen is en prise. A fact that I simply missed. I saw 28.Nxd6+??, capturing a bishop with check, and thought I would be lost. Clearly, with 28...bxc4, capturing White’s queen, the tables are turned.
Just to complete the above line, after 28.Nh6+ Kf8!? 29.Qg8+ Ke7 30.Qxh7 White has pawn and bishop for the exchange with my king crawling around. I’d judge the position as “balanced,” but in a practical game it is easier to play White. For example, 30...Rf8 (in order to make a run to the queenside with my king) 31.f3 Kd7 32.Ng4 Qe6 33.Bf2 leaves me with a g7-pawn to worry about. For this reason I would have allowed the perpetual if I had realized that White’s queen was attacked.
In his annotations in Informant 41, Anatoly said that after 21...Bg6 22.c4 White has a big advantage and stopped his analysis. I disagree. It seems to me that 21...Bg6 was my best move, and that Black has an easy game after 22.c4 a6! 23.Rb2 (the only square, as 23.Rb1 or 23.Rb3 Bc2 loses an exchange and 23.Rd5 Be4 is helpful to Black; with the rook on the b2-square the d4-pawn is now pinned) 23...Qf6 24.Bc3 (24.c5? Bxc5) 24...Be4 (24...Bh5!?) 25.Qd1 Rbe8! 26.Rxb7 Bxf3 27.Bxf3 Rxe1+ 28.Qxe1 Nxd4, when the game is even as White can’t retain the two bishops: 29.Kh1? Nxf3 or 29.Qd1 Ne2+ and ...Qf6xc3, and finally 29.Bd1 f3 30.g3?? Bxg3 is good for Black. In this note, there is also a temptation to grab the hanging a3-pawn as well, which I restrained myself from doing.
22.Qc2! a6 23.Rf5!
Further irritation. Anatoly is forcing a trading sequence before I can even begin to realize an initiative. He correctly intuited that the “good-looking” b1-rook was not as useful in the position as my f8-rook. By trading them away, White reduces any dangers to his kingside.
23...Rxf5 24.Qxf5 Bg6 25.Qg4!
This is really becoming annoying. White keeps his queen buzzing around the kingside, not only bottling up my initiative up but also keeping his options of a knight hop to the g5-square alive.
Anatoly rejected the attractive-looking centralization 25.Qd5 Bxa3! 26.Qxd8+ Rxd8 27.Bxf4 Bb2!, with an ending where both players have trumps. Also, 25.Qe6 Qf8, intending to gain a tempo by ...Rb8-e8, would misplace White’s queen.
25...Qf6 26.Bc4 Rf8
I had my doubts about this very normal-looking move, which brings my rook into play. Now that White has the e-file, he will always have fine play based on a rook invasion, there is the potential for Nf3-g5-e6, and it can easily happen that the advanced f4-pawn becomes a liability. My key alternative was 26...Bf5, to cover the e6-square: 27.Qg5 b5!? 28.Bd5!? Ne7 29.Bb3 Ng6, inviting White to play Qg5xf6, doubling my pawns if he should wish to do so. In that case leaving my rook on the b8-square may be beneficial in the ending, as the a3-pawn could advance and I have an opportunity to seize an open b-file.
27.a4!
A little move that simply moves the pawn on from a square where it can be captured. In a strange way, my position has hit a wall and I don’t have a definite plan to strengthen my position further. If I try to reposition my knight with 27...Ne7, I weaken the control over the e5-square and simply invite 28.Ne5, with advantage to White.
27...Bc2
While it looks strange to go pawn-hunting, that is my style. My problem was that if I now try to trade queens by 27...Bf5 28.Qg5 h6 29.Qxf6 Rxf6 30.Re8+ Kh7 31.Ne5!, White has the initiative. The idea of the text isn’t just to snap off the a4-pawn (oh, yes it is!), but also to be able to play ...h7-h6 and ...Bc2-f5, kicking the g4-queen off her perch.
Timman now makes the embarrassing comment that the text was a “fruitless excursion” and that, “...a more stubborn defense would have been 27...h6 which, sooner or later, would have been inevitable...” Jan is truly a gifted annotator, but in this case he had a very rare momentary blind-spot, as 28.Re6! wins a piece at once.
The text was necessary to make way for the “inevitable” ...h7-h6, and luft.
28.Qh5
Not a bad move, but I was much more worried about 28.Ng5! Bf5 29.Ne4! Bxg4 30.Nxf6 Bxh3 31.Nxh7 Kxh7 32.gxh3 when White has the two bishops at the cost of split kingside pawns. Perhaps the ending isn’t so bad for Black, but I didn’t like it.
28...h6?!
I was pleased to play this move to take away Nf3-g5, and while I didn’t trust the pawn grab 28...g6 29.Qd5 Bxa4 30.Ne5 Nd8!?, it wasn’t an entirely bad option, as many key squares are covered. Black can reset his pieces by ...Ba4-e8 or ...Ba4-c6, and respond to White’s threats as they appear. The “fruitless excursion” has earned a reward. If you are going to grovel, you may as well do so with an extra pawn.
In his Informant notes, Anatoly points out the attractive finish 28...Bxa4 29.Ng5 h6 30.Nf7+ Kh7 31.Re6 as winning for White.
29.Re8!
Impressive, dare I say sublime, understanding. Again, the e1-rook looks better than its f8-counterpart, but my rook is defending some important squares, including the g8-square. By trading rooks White eliminates a key defender and the squares around my king become more vulnerable.
Around this point it began to dawn on me that my c6-knight is not really doing anything and is in fact nicely corralled by White’s central pawns. I began to look for an opportunity to bring it into play.
29...Bf5
A rather shamed-faced retreat. This time 29...Bxa4? 30.Re6 Qf5 31.Qxf5 Rxf5 32.Nh4! sinks my ship because of my weak g6-square.
One line attractively shows how the second rook trade helps White: 29...Bg6 30.Rxf8+ Bxf8 31.Qd5!, threatening 32.Qg8 checkmate.
30.Bd5! Bd7 31.Rxf8+ Qxf8 32.Nh4 Be8 33.Qe2!
Correctly avoiding 33.Ng6+? Bxg6 34.Qxg6 Ne7 35.Qe4 Nxd5 36.Qxd5, which would give me an opportunity to trade two pairs of minor pieces and equalize.
At this moment, time-trouble was beginning to rear its ugly head and under its relentless pressure I surrendered the wrong bishop.
33...Nd8?
A very bad mistake, induced by time-trouble, which allows White to increase his advantage significantly. The best move was 33...g5! (remember that kingside pawn-storm?) 34.Nf5 Bg6 35.Nxd6 Qxd6 36.Bf3 Kg7, although White definitely has the sunny side of the torture. The idea of the dark-squared bishop being transferred to the long diagonal made me shudder. Nonetheless, it was here that my best hopes for salvation lay.
34.Qe4!
This powerful centralizing move gives White domination over the light squares and a strategically winning position.
34...Qe7 35.Ng6+ Bxg6 36.Qxg6 c6 37.Bb3 b5 38.Kf1 Qf8 39.Bc2 Kg8 40.Bb3+ Kh8
Having successfully made the time-control, I could now assess the damage. It wasn’t pretty. White’s g6-queen is omnipotent. In fact, I didn’t see any chances for play.
41.h4?!
While it is desirable to have an h5-pawn, insuring that any queen trades on the g6-square will be terrible for Black, it was much stronger to crack the whip by playing 41.c4! immediately. White would be threatening c4-c5, with a strategical stranglehold. If 41...bxc4 42.Bxc4 and the a6-pawn is lost. Then 42...bxa4 43.Bxa4 c5 44.Bc2 Kg8 45.Qh7+ Kf7 46.dxc5 Bxc5 47.Bxf4 wins a pawn and retains the initiative as well. As I’m being allowed to fight on, the game continues.
41...Nb7 42.c4 Qg8
Black is running out of moves.
43.Qd3?
Releasing his grip on the position. With the natural and consequent 43.d5! White will realize his dream of putting his dark-squared bishop on the long diagonal, and the game will be over shortly. For example, 43...cxd5 44.cxb5 axb5 45.Bc3 Qh7 46.Qe8+ Qg8 47.Qxg8+ Kxg8 48.Bxd5+ when I can give it a rest. Now the fight flares anew.
Timman’s comment about the text is illuminating: “White allows himself to be intimidated. Immediately after the adjournment Karpov indicated he had overlooked a magnificent win here. 43.Bc2!! would have been the end, despite the fact that Black can capture on c4 with check. The point is that after 43...Qxc4+ 44.Bd3 Qg8 45.Bc3, Black has no defense against the threatened 46.d5, followed by 47.Qxh6+ and mate. 45...b4 46.Bb2 would be no more than a stay of execution.
“This is a good illustration of the strength of the so-called Horwitz bishops. If Karpov had not found this a little too late, this game would have been a true masterpiece of accuracy and subtle maneuvering. The advantage of Karpov’s hesitation is that the game is now extended by an instructive endgame.”
I couldn’t agree more with the final paragraph. Before the text Anatoly had played marvelously from a position I had prepared. Exactly as in our game in Tilburg that he had won. My only comfort then was that I was able to resist and forced Anatoly to make a great effort to win...
43...Qh7 44.Ke2 g5 45.c5 Bc7 46.axb5
In his annotations in the Informant Anatoly called this move dubious. While it is true that keeping an extra pair of pawns on the board usually favors the player with the initiative/advantage, in that he has extra options, this strikes me as a case of nit-picking. The text is perfectly fine and leads to a winning position.
46...axb5 47.h5 Ba5
I’m still struggling in a near hopeless situation. Again, Anatoly has the opportunity to reel the victory home by 48.Qxh7+ Kxh7 49.d5!, with a decisive breakthrough. I had in mind what I thought was a cunning trap – 49...Bc7, hoping to induce 50.d6 Ba5!, when shockingly and completely undeservedly Black has real holding chances. The problem is that with 50.dxc6! Nxc5 51.Bd5 Black will be unable to create a fortress and eventually White’s king will smash through.
48.Bc1?
A mistake that allows me to continue to resist.
48...Qe7+ 49.Kd1
An embarrassing retreat of his own. Anatoly had intended 49.Kf3, considering his king “untouchable.” He now saw that 49...g4+ 50.Kxg4 Qg5+ 51.Kf3 Qxh5+ was very much a “touchy feely” variation that he would greatly prefer to avoid.
49...Qe1+ 50.Kc2 Qxf2+ 51.Kb1
Well, grabbing a pawn with check was a pleasant surprise, but now I face a serious problem. With Qd3-g6 or d4-d5 and Bc1-b2+, White has a ready-made checkmating attack. With deep regret I’m forced to trade queens and double up my kingside pawns. I feared that the resulting ending would lead to a loss by zugzwang, but it was the only way to continue the fight.
51...Qg3 52.Qxg3
Playing into the ending that I feared most, and a very human decision. My engine prefers 52.Qd1!, informing me that White will have a checkmating attack after 52...Qxg2 53.d5! Qe4+ 54.Bc2, when Black’s king is helpless against the ferocious bishops and passers.
Another attractive finish would have been 52.Qd1 Bd8 53.Bb2 Bf6 54.d5! Bxb2 55.dxc6, winning.
52...fxg3 53.Kc2?
Anatoly continues to make his task more difficult, allowing me to put up a fight. The best move was 53.Bb2!, putting me in a quandary. If I play 53...Kh7, my king will be shuttered out of play on the kingside, and White’s king will sprint to the center and the game is over. Therefore, 53...Kg7 would more or less be forced, and now the difference compared to the game is clear: 54.d5+ Kf8 55.dxc6 Nd8 (unlike in the game, I cannot capture the c5-pawn: 55...Nxc5 56.Ba3! b4 57.Bxb4 Bxb4 58.c7, and the c-pawn promotes) 56.Bd5, with an extra pawn and domination of the board.
In his Informant notes, Anatoly lets this move pass without comment and merely points out that after the text White stands slightly better. True enough, but after 53.Bb2! I’d evaluate the position as winning.
53...Kg7 54.d5 Nxc5 55.Bb2+ Kf8
It felt as if I was running through a mine-field in this tricky ending, avoiding some explosives altogether while those I stepped on failed to explode, giving me a reprieve. Once more my time was nearly exhausted. (A reminder, the time-control was 40 moves in two hours, followed by 20 moves in one hour thereafter, so it is move 60 and not 56 that is the time-control.)
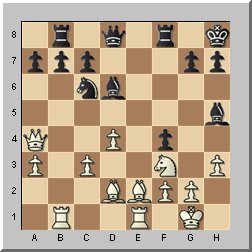
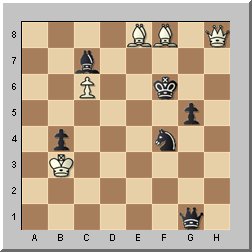
56.dxc6 Na6! (Diagram 141)

Thanks to his slips, Anatoly has given me a real chance to save the game. This ending is quite an interesting one thanks to the possibility of a fortress with a d6-bishop, a c7-knight and a b5-pawn to keep White’s king at bay. The problem is that the h6-pawn needs constant protection, and either my king or bishop will be anchored to it.
57.Ba3+! Ke8!
It is vital that the b5-pawn should remain where it is, as it helps control the approaches for White’s king. 57...Bb4?? would be a dreadful mistake which, after 58.c7!, would cost me the game at once.
58.Be6! Bb4!
Now this move is playable as 59.c7? Nxc7 attacks the e6-bishop.
59.Bb2 Bf8?
Not the common last move of the time-control blunder, but rather the penultimate move of the time-control blunder. While the desire to protect the h6-pawn is clear, it isn’t my major problem. The c6-pawn is the bone in my throat. Afterwards I was sure that 59...Be7 would draw the game thanks to 60.Bd7+ Kd8 61.Bg7 Nb8! 62.Bxh6(?) Nxd7 63.cxd7 Kxd7 64.Bg7 Ke6 65.h6 Kf7, when Black’s king is just in time to stop the h-pawn.
However, as Timman shows, 62.c7+! Kxc7 63.Bxb5 will lead to the win of the h6-pawn, when White has excellent practical chances. He thus correctly refutes my claim that 59...Be7 would have drawn.
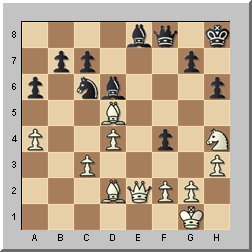
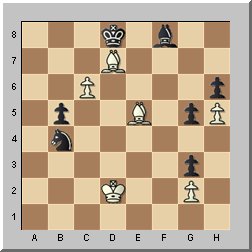
Nevertheless, I will begin a new contention that the position could be saved. My missed opportunity was concealed in a very nice resource: the trapping of White’s bishop after it captures the h6-pawn. This idea is best illustrated by 59...Bd6! 60.Bg7 Nb4+ 61.Kd1 Ke7!! 62.Bd7 Nd5 63.Bxh6 Kf6!, bringing us to our analysis diagram.
Analysis diagram
This was the saving resource which I missed. With the h6-bishop out of play, White has to deal with two problems, the passed b5-pawn and the vulnerability of the g2-pawn. The position is extremely tricky, with almost problem-like traps lurking at every move. For example, from the analysis diagram, White may be tempted to reposition his d7-bishop to the g6-square by 64.Be8?, but this is a bad idea as 64...Ne3+ 65.Kd2 Nf5! 66.Bf8 Bxf8 67.c7 Nd6 is some fine knight hopping indeed.
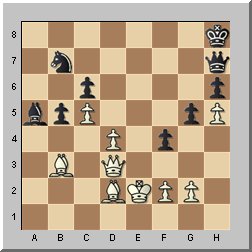
It seems to me that the analysis diagram position is drawn. If White’s king goes to deal with the b5-pawn with 64.Kc1, then after 64...Ne3 65.Bh3 (65.Bf8 Bf4 and the g2-pawn falls with check) 65...g4 66.Bxe3 gxh3 67.gxh3 g2 we arrive at a most unusual ending worthy of another diagram.

Analysis diagram
In view of Black’s threat of ...Bd6-f4, White will not find the time to advance his pawns: 68.Kd1 Bf4! 69.Bg1?! (69.Bd4+ Be5 70.Be3 Bf4 is a repetition) 69...Ke6 70.Ke2 b4!, and Black has the advantage.
A new world of possibilities occurs after 64.Kd2 b4 65.Kc2 Ne3+ 66.Kb3 Nxg2 67.Bf8! (a thematic escape by the h6-bishop) 67...Bc7 68.h6 Nf4. White can acquiesce to a draw with 69.h7 Ng6 70.Bh3 Kf7 71.Bh6 Nh8 72.Bxg5 Kg6, or allow both sides to queen with 69.Be8 g2! 70.h7 g1=Q 71.h8=Q+, bringing us to our last analysis diagram position.
Analysis diagram
White cannot win this position, as after 71...Kf5 72.Qh7+ Kg4 the bishop is poison (73.Qxc7? Qd1+ and White will find his king and queen forked.)
Backing up for a moment, we should note that the variation starting with 59...Bd6! raises several questions. Why didn’t White play 60.Bd7+, protecting the c6-pawn? In that case 60...Kf7! protects the g7-square and prepares the knight trek ...Na6-b4(c7)-d5-f4, going after the g2-pawn with counterplay. Then, after 60.Bg7 Nb4+ 61.Kd1 why not take the c6-pawn right away? But 61...Nxc6? 62.Bxh6 Be7 63.Bg7 Bf8 64.Bf6 Be7 65.Bb2 Bf8 66.Kg2 gives White an advantage that is best avoided.
The text is my last mistake, not because I now play perfectly, but because I’m not given another chance to save the game.
60.Bd7+ Kd8
Although we successfully reached the time-control, the next two forcing moves were made rather quickly as well.
61.Be5 Nb4+ 62.Kd2
Here the game was adjourned, and I sealed my move. It would be two days until resumption, and I spent some sleepless nights trying to save the position. The adjournment gathered much attention from the other competitors as well, and there were many forceful opinions.
62...Nd5
My sealed move was the best, but it wasn’t good enough to save the game.
63.Be6 Nc7
The prelude to a line that leads to my immediate capitulation, which was highly annoying considering the time I had to analyze the position. I missed White’s 66th move completely, and my adjournment analysis was rendered complete crap in an instant. Arguably, the worst adjournment analysis I ever made went into this game. (At least I hope this was the case!)
Having lost the thread of the position let me turn the reins over to Timman’s notes as he quotes Karpov: “Karpov rejected this move during the post-mortem. Shortly before the resumption he had found a defensive plan starting with 63...Bb4+ for which he had not been able to find an immediate refutation.
“Now the White king has to be careful in its choice of squares, as both 64.Kd3 and 64.Ke2 are met by 64...Nf4+, while 64.Kd1 is effectively refuted by 64...Bc3!. The only correct reply is 64.Kc2, after which Karpov had considered 64...Nc7 65.Bf7 Na6 66.Bg7 Ke7 67.Bg6 Ba5. It seems strange to put the minor pieces back in the same positions as eight moves earlier, but he assured everyone that this was Black’s only chance and that he had planned to continue with 68.Kd1.”
Indeed, I do not understand 67...Ba5? either. For sure, Black should try 67...Bd6! as a better chance to save the game. Timman continues:
“He had not analyzed this any further as he assumed Seirawan was unlikely to consider two such paradoxical and decentralizing moves in a row.
“Later the American turned out not to have been too impressed by the position either, regarding it as lost in all variations. His prolonged search for saving options had been in vain. Personally, I also fail to see how Black should save himself, e.g. 68...Nb4 69.Be4 Na2 70.Bf5 Nb4 71.Bd7, followed by 72.Bxh6, and Black is doomed.”
I can only add that in no way during my analysis was I trying to defend the position by returning my pieces to the a-file. Such ideas simply didn’t occur to me.
64.Bf7 Ne8?
This is really bad. As I’ve already mentioned, I just missed White’s 66th move. My best chance was 64...b4! (for some reason, I thought my b5-pawn should remain fixed to block White’s approaching king) 65.Kd3 Nb5 66.Bd5 Bd6, hoping to get a line like 67.Bg7 Ke7 68.Bxh6? Kf6, trapping White’s bishop. While I think White should win this ending, Black is fighting. The text should lead to immediate resignation.
65.Bxe8!
Trading into a bishop of the same colors ending wins instantly because I had missed something...
65...Kxe8 66.Bf6!
And this is it. In the words of Victor Kortchnoi, “So simple.” Indeed. Black isn’t given a chance to play ...Ke8-e7-e6, to keep White’s king at bay. The rest of the game is futile, and I played on rather out of inertia. Just as I feared at the start of this whole ending, indeed I would be forced into zugzwang.
66...g4 67.Kc3 Bd6 68.Bg7 Bf4 69.Kb4 Kd8 70.Kxb5 Kc7 71.Kc5 Be3+ 72.Kd5 Bf4 73.Bf8!
This is the zugzwang. Black can hang it up.
73...Kb6 74.Bd6 Bg5 75.Bxg3 1-0. [Click to replay]
Losing is always tough, but this game felt like four losses in one. Firstly, because I had the position I had prepared on the board and lost in my prepared variation. Not good! Secondly, because after 40 moves I had been masterfully outplayed and should have lost shortly thereafter, but was allowed to keep fighting on. Thirdly, because I had a draw that I missed in time-trouble. Finally, despite nearly two whole days of adjournment analysis I went barking up the wrong tree. That is a lot of “defeats” for one game. For Anatoly it was a win that he won twice and he probably wasn’t too pleased with his various slips. But he obtained the victory and the whole point.
Readers who have managed to right themselves after the above can now treat themselves to the cliffhanger answer from the completely shameful Bridge episode…
From pages 225-226: Chapter 7 (Anatoly Karpov):
One part of this event I’ll always remember: the flight from Hamburg to the UK. As fate would have it, Anatoly and I ended up seated next to one another. After the flight took off and settled into cruising altitude we were informed that a snack/lunch service would soon be served. Suddenly, it seemed like an excellent opportunity to make a confession.
I started the conversation with a great deal of trepidation. “Anatoly, I’m sorry to say that I have a confession to make.”
Anatoly immediately objected: “Confession? Surely not. You have nothing to be sorry for.”
At this point I understood that Anatoly may have been thinking of my having assisted Victor Kortchnoi during his 1981 match. “Well, you’ve probably completely forgotten the incident already... But we once played bridge and, well, Larry and I fixed a hand...”
Anatoly was immediately up to speed and right on topic. His reaction was completely unexpected. “Oh my! Thank you so much for telling me. You know, I had nightmares for months about that hand...
You can buy Chess Duels at the UK London Chess Centre store
here,
or in the US at the Chess4Less store here.